WordPress supports installing and updating plugins and themes from the official store right through the WordPress admin interface. However, after trying to install or update a large plugin (like WooCommerce) or theme, you may encounter an error like this:
Installation failed: There has been a critical error on your website. Please check your site admin email inbox for instructions. Learn more about debugging in WordPress.
This error means that the installation process crashed, and may have left you with a broken website. To fix this, you’ll have to get rid of the broken plugin or theme and fix the installation by hand.
Identifying the broken plugin or theme
If you were trying to install or update a specific plugin, you can skip this step. But if you were running a bulk update, or an automatic update happened while you were away, you may be wondering which plugin or theme failed has broken down.
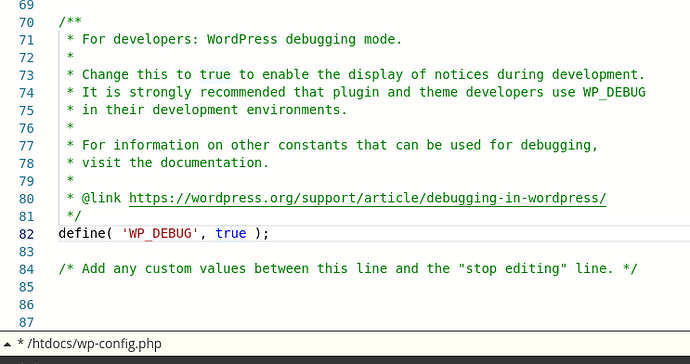
You can figure this out by enabling debug mode in WordPress:
-
Login to an FTP client of your choice or our web based file manager (found in the client area and control panel).
-
Navigate to your website folder (which is
htdocsfor your first domain andexample.com/htdocsfor addon domains and subdomains). -
Open the file
wp-config.phpand find the line which containsWP_DEBUG. On that line, replacefalsewithtrueand save the file.
-
Refresh the page on your website and you should now see error messages.
In these error messages, you should search for texts like wp-content/plugins/ and wp-content/themes/. The word right after that is the folder of the plugin or theme which is generating the error, which is generally the broken plugin or theme.
Don’t forget to disable WP_DEBUG after you’ve seen the error message. The option should not be left enabled for live sites, because it might expose sensitive information.
Deactivating a broken plugin
If a plugin installation has been corrupted, the first thing to do is to disable the broken plugin.
If your WordPress admin area is still working, you can deactivate the plugin from there. If that’s an option, deactivating the plugin from there is the easiest option.
If your WordPress admin area is now broken, you will have to deactivate the broken plugin by hand. You can do so as follows:
- Login to an FTP client of your choice or our web based file manager (found in the client area and control panel).
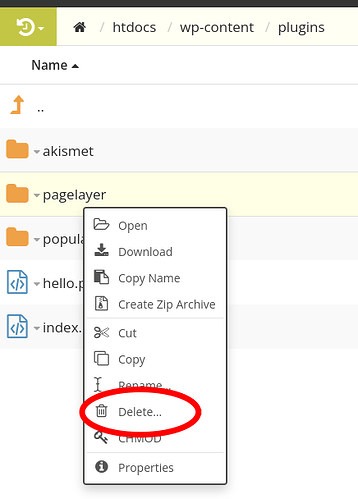
- Navigate to your WordPress plugins folder. This is typically
htdocs/wp-content/pluginsfor your first domain, andexample.com/htdocs/wp-content/pluginsfor addon domains and subdomains. - Find the folder of the broken plugin (it should resemble the name of the plugin).
- Right click the folder and select “Delete”.
After this, your WordPress website and admin area should be accessible again.
Deactivating a broken theme
If a theme installation has been corrupted, the first thing to do is to switch to a different theme which does work.
If your WordPress admin area is still working, you can switch the theme from there. If that’s an option, changing the theme from there is the easiest option.
If your WordPress admin area is also unreachable, you can change the active theme by hand. You can do so as follows.
-
Login to an FTP client of your choice or our web based file manager (found in the client area and control panel).
-
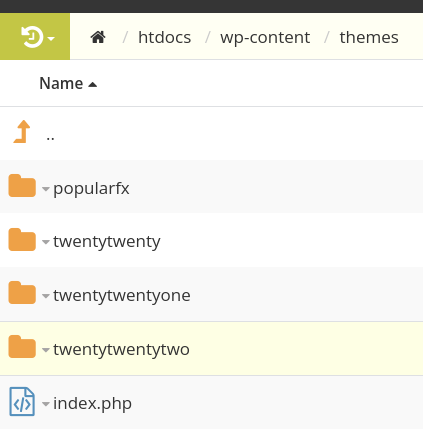
Navigate to your WordPress themes folder. This is typically
htdocs/wp-content/themesfor your first domain, andexample.com/htdocs/wp-content/themesfor addon domains and subdomains. -
Check which other folders you have there. These are other themes you have on your site, which you can try. Pick one and copy the folder name somewhere. The WordPress default theme (with a name starting with
twenty) is a good choice if you have it.
-
Login to the control panel of your hosting account and navigate to the phpMyAdmin section. From there, click the Connect Now button next to the database of your WordPress site.
-
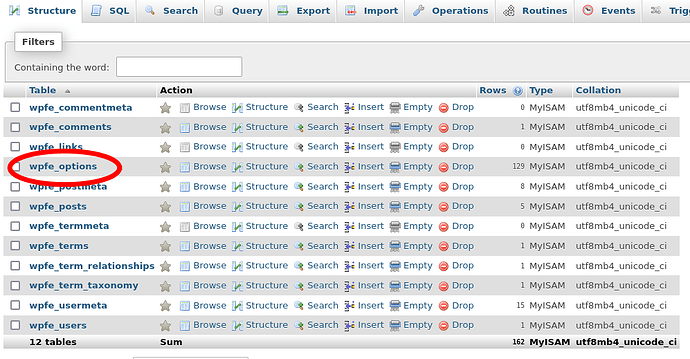
Click to the table with the name ending with
_options.
-
Find the row where the column
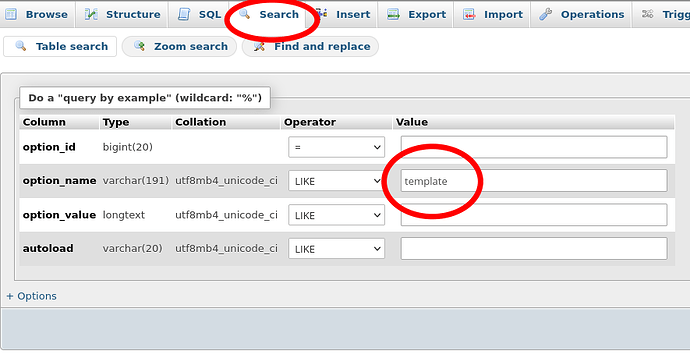
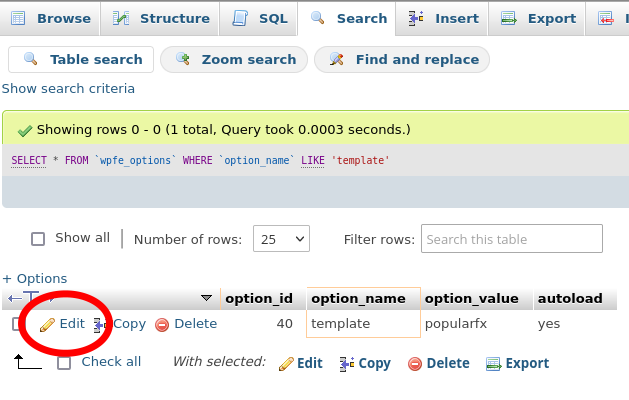
option_nameequalstemplate. You can use the Search button at the top bar to find it.
-
Edit the
option_valuecolumn of the row you found, and change it to the theme name you found before.
After this, your WordPress theme should be changed to the other theme you selected. Assuming this theme was installed correctly, you should now be able to access your site again.
Installing the plugin or theme by hand
After you’ve removed the broken plugin or theme, you can try to install it again. You can try to do so through the WordPress admin area, but if you try this, you’ll likely end up with a broken installation again.
That’s why you can try to install the plugin or theme by hand instead.
To do so, the first step is to download the plugin or t heme zip file to your computer. If you got the plugin from a third party source, you probably already have this file. If you installed it directly from WordPress, you can find and download your plugin from the official WordPress plugin store or theme store
Next, you’ll need to upload the files to your account.
To upload the plugin or theme with FTP:
- Extract the zip file on your computer. It should contain a single folder with files.
- Setup a connection with your FTP client of choice. Learn more about how to setup an FTP connection.
- Navigate to your WordPress plugins or themes folder. This is typically
htdocs/wp-content/pluginsfor your first domain, andexample.com/htdocs/wp-content/pluginsfor addon domains and subdomains. For themes, it’s the - Copy the extracted folder to the website directory. Depending on the size of the plugin or theme, this can take some time complete.
- After the file transfer has been completed, login to your WordPress admin area. From there, you can navigate to the Plugins or Themes interface and hit Activate on what you’ve just uploaded.
You can attempt to upload the archive through our online file manager, but this may not work depending on the size of the plugin or theme. Using a desktop FTP client like FileZilla is recommended, because it works with plugins and themes of all sizes.

